linux server – cron , crontab

Cron

Cron is a daemon that executes scheduled commands. Cron is started automatically from /etc/init.d Cron searches its spool area (/var/spool/cron/crontabs) for crontab files. It load crontab files on memory to run.

cron is a unix, solaris utility that allows tasks to be automatically run in the background at regular intervals by the cron daemon.


We cannot access crontab files directly , it will be accessible via crontab.

Cron also reads /etc/crontab, which is in a slightly different format. Additionally, cron reads the files in /etc/cron.d.

Cron runs every minute and check for whether any job has to run or not. It can modify automatically so we do not nee dto restart server after making changes to crontab.

Crontab

Crontab is the program which contains lists of job to be run. Crom daemon looks that list and run the job as per scheduled.


crontab -e    Edit your crontab file, or create one if it doesn’t already exist.
crontab -l      Display your crontab file.
crontab -r      Remove your crontab file.
crontab -v      Display the last time you edited your crontab file. (This option is only available on a few systems.)


Crontab format:-

Commands are executed by cron when the minute, hour, and month of year fields match the current time, and when at least one of the two day fields (day of month, or day of week) match the current time.


Crontab syntax :
A crontab file has five fields for specifying day , date and time followed by the command to be run at that interval.

*     *     *   *    *        command to be executed
-     -     -   -    -
|     |     |   |    |
|     |     |   |    +----- day of week (0 - 6) (Sunday=0)
|     |     |   +------- month (1 - 12)
|     |     +--------- day of        month (1 - 31)
|     +----------- hour (0 - 23)
+------------- min (0 - 59)


A field may be an asterisk (*), which always stands for “first-last”.

Ranges of numbers are allowed. Ranges are two numbers separated with a hyphen. The specified range is inclusive. For example, 8-11 for an “hours” entry specifies execution at hours 8, 9, 10 and 11.

if you want to say “every two hours”, just use “*/2”.

example

minutes , hours, day of month , month , day of week, command(or path of shell script)

An example of crontab format with commented fields is as follows:

# Minute   Hour   Day of Month       Month          Day of Week        Command    
# (0-59)  (0-23)     (1-31)    (1-12 or Jan-Dec)  (0-6 or Sun-Sat)                
    0        2          12             *               0,6           /usr/bin/find

reference:


http://www.pantz.org/software/cron/croninfo.html

http://www.adminschoice.com/crontab-quick-reference/

example of crontab:-

[anand@server001 ~]$ crontab -l
#*/5 * * * * /home/anand/scripts/apacheMon.sh
*/5 * * * * /home/anand/scripts/mysqldMon.sh
#*/5 * * * * /home/anand/scripts/apacheaccesslog.sh
*/5 * * * * /home/anand/scripts/apacheerrorlog.sh
*/10 * * * * /home/anand/scripts/cpuidle.sh
*/10 * * * * /home/anand/scripts/dbstat.sh
*/5 * * * * /home/anand/scripts/diskalert.sh
00 00 * * * /home/anand/scripts/deadlock.sh

[anand@server001 ~]$ more /home/anand/scripts/deadlock.sh
#!/bin/sh
#***********************************************************************
#Script to check deadlock
#Created by Anand
#***********************************************************************
Maillist=”anand.kumar@test.com”
host=`hostname`
File_Location=”/apps/www/anand/log”
#printf ‘file location’$File_Location
#dateformat=`date +%d-%m-%Y`
dateformat=`date +%d-%m-%Y -d “1 day ago”`
#printf ‘date format’$dateformat
FILE=$File_Location/$dateformat\_DbFailure.txt
if [ -f $FILE ];
then
Count=`grep -i “Invalid query: Deadlock found when trying to get lock;” $FILE | wc -l`
if [ $Count -gt 0 ]
then
echo -e “Invalid query: Deadlock found on Server 001, Please manually run the insert commands.\n Number of deadlock found:$Count.\n Path of insert query is: $FILE” > /tmp/Error
mail -s “Critical!! – Deadlock while insertion in server001” $Maillist < /tmp/Error
fi
fi
[anand@server001 ~]$ vi /home/anand/scripts/deadlock.sh

To edit the shell script.

How to Install SQuirrel SQL Client on windows

                                                  How to install Squirrel SQL Client

STEP 1. Hit the URL:- http://www.squirrelsql.org/#installation


Click on the link on the page

Install jars of SQuirreL 3.3.0 for Windows/Linux/others

After clicking the above link , you are able to download “squirrel-sql-3.3.0-install.jar”.

Save “squirrel-sql-3.3.0-install.jar” file in C Drive.


STEP 2:- Open Command line (CLI) [start->run->cmd and press ENTER]

C:\Documents and Settings\Kumar>cd ../..

C:\>

Now , type java -jar squirrel-sql-3.3.0-install.jar at CLI and press ENTER

It will open SQuirrel software installation package. Just click on next , next and install the software.

STEP 3:- Open Squirrel software and click on Drivers tab


STEP 4:- To enable Oracle Thin Driver , you have to download ojdbc14.jar and add this jar file in “Squirrel\lib” folder.


Download link: http://www.findjar.com/jar/mule/dependencies/maven1/oracle-jdbc/jars/ojdbc14.jar.html


Restart the Squirrel software, where you can able to see that Oracle Thin Driver is enabled.


STEP 5:-

Click on Aliases tab , click on +(add) button to add new database.

In ADD Alias , provide NAME for Database ,

Select Oracle Thin Driver  in Driver drop down box.

Provide the URL , Username and password.

URL should be like:-

jdbc:oracle:thin:@101.101.198.134:1621:PRODDB


Click on TEST button , if all details are correct then it should show below mentioned  message on screen.

CSS behaviour on IE & Other Browsers

In this post , i want to emphasize how exactly the css behave on IE and Other browsers like firefox , google chrome , opera etc.

I would like to share my personal experience and challenges which i have faced during working on different different browser for an application.
here are the some challenges in key points:

1.Display box in IE & other browser

Solution:
For IE:-

#box{ display:inline; border: solid 1px; }

For Other browser:-
#box {
display: inline-block;
border: solid 1px;
}

2.Anchor tag (hyperlink) visited issue

Html code :

tesing hyperlink

a:link {
color: #A5ACB0;
}
/* visited link */
a:visited {
color: #00ADEF;
}
/* selected or active link */
a:active {
color: #A5ACB0;
}
/* Hover link */
a:hover {
color: #00338E;
}

Test IE
Test ALL

For IE Broswer:-
After clicking on TestIE link , it will show a:visited color but when you go to other page and come back to the same page where you have TestIE link , the color of hyperlink will as a:link .
Logically , it should be a:visited color because you have visited the link.
This logic won’t work on IE 6,7,8 and other latest IE versions but work perfectly fine on any other browsers.

But After clicking on TestALL link on any browser, it shows visited color .

Image onmouseout , onmouseover and onclick

Requirement:- A web page should contain an image say top arrow image.
When user visit to a page , top arrow image should be in disable form (say in grey color) , when user hover over the image , it should get activated and turns to other color (say in green) and when user clicks on that image , it should turns to other color (say blue).

images:- top_arrow_disable.jpg , top_arrow_active.jpg and top_arrow_visited.jpg

1st Solution:-

<script type=”text/javascript”>
function checkHidden(id,checkVal){
var hiddenVal = document.getElementById(‘check’).value;
if(hiddenVal==’clicked’){
if(checkVal==’over’){
document.getElementById(id).src=”images/up_arrow2.gif”;
}
if(checkVal==’out’){
document.getElementById(id).src=”images/up_arrow3.gif”;
}
//document.getElementById(id).src=”images/up_arrow3.gif”;
//alert(‘Link is already clicked:Onclick takes precedence’);
}
else{
if(checkVal==’over’){
//alert(‘on mouse over’);
document.getElementById(id).src=”images/up_arrow2.gif”;
}
else if(checkVal==’out’){
//alert(‘on mouse out’);
document.getElementById(id).src=”images/up_arrow1.gif”;
}
else if(checkVal==’clicked’){
//alert(‘just clicked’);
document.getElementById(id).src=”images/up_arrow3.gif”;
document.getElementById(‘check’).value=’clicked’;
}
}
}

</script>
<a  href=”#top” onclick=”checkHidden(‘a1′,’clicked’);” onMouseOver=”checkHidden(‘a1′,’over’);” onMouseOut=”checkHidden(‘a1′,’out’);”>
<img id=”a1″ src=”images/up_arrow1.gif” name=”anandf” width=”16″ height=”16″ border=”0″>
</a>

2nd solution:-

 <script type=”text/JavaScript”>
<!–
function MM_swapImgRestore() { //v3.0
  var i,x,a=document.MM_sr; for(i=0;a&&i<a.length&&(x=a[i])&&x.oSrc;i++) x.src=x.oSrc;
}

function MM_preloadImages() { //v3.0
  var d=document; if(d.images){ if(!d.MM_p) d.MM_p=new Array();
    var i,j=d.MM_p.length,a=MM_preloadImages.arguments; for(i=0; i<a.length; i++)
    if (a[i].indexOf(“#”)!=0){ d.MM_p[j]=new Image; d.MM_p[j++].src=a[i];}}
}

function MM_findObj(n, d) { //v4.01
 var p,i,x;  if(!d) d=document; if((p=n.indexOf(“?”))>0&&parent.frames.length) {
    d=parent.frames[n.substring(p+1)].document; n=n.substring(0,p);}
  if(!(x=d[n])&&d.all) x=d.all[n]; for (i=0;!x&&i<d.forms.length;i++) x=d.forms[i][n];
  for(i=0;!x&&d.layers&&i<d.layers.length;i++) x=MM_findObj(n,d.layers[i].document);
  if(!x && d.getElementById) x=d.getElementById(n); return x;
}

function MM_swapImage() { //v3.0

  var i,j=0,x,a=MM_swapImage.arguments; document.MM_sr=new Array; for(i=0;i<(a.length-2);i+=3)
   if ((x=MM_findObj(a[i]))!=null){document.MM_sr[j++]=x; if(!x.oSrc) x.oSrc=x.src; x.src=a[i+2];}
}
//–>
</script>

<a href=”#top” onMouseOut=”MM_swapImage(‘Top’,”,’../images/up_arrow3.gif’,1)” onMouseOver=”MM_swapImage(‘Image1′,”,’../images/up_arrow2.gif’,1)”><img src=”../images/up_arrow1.gif” name=”Image1″ width=”16″ height=”16″ border=”0″></a>

PHP PDO

PHP PDO :-PHP Data object is a database connection abstraction library for PHP 5.

What is  PDO ?

  • Its written in complied language(c/c++) , other php libraries are written in Interpreted language (AdoDB , PEAR DB)
  • its lightweight database connection abstraction library

WHY PDO ?

  • It support many databases , so you don’t need to write lines of code of each database , just write one code and run on any database
  • Speed . PDO is written in complied language but others php libraries like PEAR DB ,Adodb are written in interpreted language.

PHP supports many databases like mysql , sqllite , postgre sql etc.

mysql_connect($host,$user,$password)

sqllite_open($host,$user,$password)

pg_connect($host,$user,$password)

so if you have to change your database from say mysql to postgre or viceversa , then you have to change your code , so you have to do rework on that.

thats way PDO cam ein picture , so that you have to write just one code and it will be work on any database platform without changing codes again and again.

PDO: Activation PHP Data Objects Extension

Goto PHP/ext folder and check whether pdo extension exists or not.

php_pdo.dll , php_pdo_mysql.dll etc.

To enable PDO , go to PHP.INI file and uncommnet the code

;extension=php_pdo.dll -> extension=php_pdo.dll

;extension=php_mysql_pdo.dll -> extension=php_mysql_pdo.dll

Restart your apache server.

PDO: connection to databases

//mysql connection

$con = new PDO(‘mysql:host=$host,dbname=$DB’,$user,$pwd);

//sqllite connection

$con = new PDO(‘sqllite:$DB’);

//postgre connection

$con = new PDO(‘pqsql:host=$host,dbname=$DB’,$user,$pwd);

or we can write like this also

<?php
// configuration
$dbtype		= "sqlite";
$dbhost 	= "localhost";
$dbname		= "test";
$dbuser		= "root";
$dbpass		= "admin";
$dbpath		= "c:/test.db";

// switching
switch($dbtype){
  case "mysql":
    $dbconn = "mysql:host=$dbhost;dbname=$dbname";
    break;

  case "sqlite":
    $dbconn = "sqlite:$dbpath";
	break;

  case "postgresql":
    $dbconn = "pgsql:host=$host dbname=$db";
	break;
}

// database connection
$conn = new PDO($dbconn,$user,$pass);

?>

PDO: Fetch Mode

// database connection
$conn = new PDO("mysql:host=$dbhost;dbname=$dbname",$dbuser,$dbpass);

// query
$sql = "SELECT title FROM books ORDER BY title";
$q	 = $conn->query($sql);

// fetch
while($r = $q->fetch()){
  print_r($r);
}

// result //Array ( [title] => PHP AJAX [0] => PHP AJAX )


// query
$sql = "SELECT title FROM books ORDER BY title";
$q	 = $conn->query($sql);
$q->setFetchMode(PDO::FETCH_ASSOC); //fetch association 
// fetch
while($r = $q->fetch()){
  print_r($r);
}

// result //Array ( [title] => PHP AJAX)


$q->setFetchMode(PDO::FETCH_NUM);

// fetch
while($r = $q->fetch()){
  print_r($r);
}

// result //Array ( [0] => PHP AJAX )
$q->setFetchMode(PDO::FETCH_BOTH);
$q	 = $conn->query($sql);

// fetch
while($r = $q->fetch()){
  print_r($r);
}

// result //Array ( [title] => PHP AJAX [0] => PHP AJAX ) 


Drupal termnology

Basically, there are 5 main layers in Drupal where information flows,

  1. Data (Node, ETC)
  2. Modules
  3. Blocks and Menus
  4. User Permissions
  5. Template


Data
Base of the system is collection of Nodes. – the data pool

Modules
These are functional plugins that are either part of the Drupal core (they ship with Drupal) or they are contributed items that have been created by members of the Drupal community.

Blocks and Menus
This is the next layer where we find blocks and menus. Blocks often provide the output from a module or can be created to display whatever you want, and then can be placed in various spots in your template (theme) layout. Blocks can be configured to output in various ways, as well as only showing on certain defined pages, or only for certain defined users.

User Permissions
Here is the next layer where settings are configured to determine what different kinds of users are allow to work and see.

Template
This is mainly the site theme or the skin. This is made up predominantly of XHTML and CSS, with some PHP variables intermixed

Understanding this flow of information is very important if you are facing A Drupal project targeted interview as the interviewer might test your overall knowledge  of  Drupal CMS by asking this sort of questions.


What is taxonomy in drupal?

We can define any number of vocabularies (category types) and terms (categories)
e.g.
Controversial Content: (vocabulary)
– violence (term)
– adult content (term)

Genre (Vocabulary)
– Comedy (term)
– Romance (term)

We can config which content types are compatible with which vocabulary and which nodes are belong to which terms.

Some important drupal modules: Views, CCK, Path auto, FCK Editor, User points, Flags, Panels, Image cache


What is a block?

Block is a section in a page (recent posts, news, vote to something, login box, navigation), which is movable to regions (header, footer, content top etc) in a page. Blocks can be configured to show/hide only to certain type of user roles, url patterns or some other advanced criteria. (Content area is not a block)

What is a node in Drupal?

A node is a unit of content. It has a type. Page, News or as Testimonial.

Which are the core required modules in drupal 6.x ?

1. Block — Controls the boxes that are displayed around the main content.
2. Filter — Handles the filtering of content in preparation for display.
3. Node — Allows content to be submitted to the site and displayed on pages.
4. System — Handles general site configuration for administrators.
5. User — Manages the user registration and login system.


Drupal Modules

These key modules are some of the most important ones to add no matter what type of site you want to build with Drupal.

We need  TOKEN module http://drupal.org/project/token


Download FCKEDitor from sourcrforge and unzip it.

Place this unzip FCKEditor folder inside sites/aa/modules/FCKEditor .

There will be another folder as FCKEditor in FCKedior module folder ,copy the unzip from above link and copy here .

  • IMCE for uploading images to insert into posts
  • Poor Mans Cron for easy execution of the Drupal cron file

What is VIEW Module ?

VIEW is a powerful query builder for Drupal that allows you to fetch and present lists and tables of content (posts/nodes) to the user in ways that are tailored to your site and your content.

The Views module provides a flexible method for Drupal site designers to control how lists and tables of content (nodes in Views 1, almost anything in Views 2) are presented. Views can be used to generate reports, create summaries, and display collections of images and other content.


You need Views if:

  • You like the default front page view, but you find you want to sort it differently.
  • You like the default taxonomy/term view, but you find you want to sort it differently; for example, alphabetically.
  • You use /tracker, but you want to restrict it to posts of a certain type.
  • You like the idea of the ‘article’ module, but it doesn’t display articles the way you like.
  • You want a way to display a block with the 5 most recent posts of some particular type.
  • You want to provide ‘unread forum posts’.
  • You want a monthly archive similar to the typical Movable Type/Wordpress archives that displays a link to the in the form of “Month, YYYY (X)” where X is the number of posts that month, and displays them in a block. The links lead to a simple list of posts for that month.


jQuery Tutorial Demo: Select All Checkboxes & validate Form

This tutorial will teach you to add validation using JQUERY validate.js file and get multiple checkbox valu using JQUERY jquery.js file.

These two js files jquery.js , jquery.validate.js is very useful when user wants to do validation of form on client side server .

Here the attached code.just download these two js files from JQUERY site and embedd in below code and run the file on browser .

<html>
<head>
<title>jQuery Tutorial Demo: Select All Checkboxes</title>
<script type=”text/javascript” src=”/jquery/jquery.js”></script>
<script type=”text/javascript” src=”/jquery/jquery.validate.js”></script>
<style type=”text/css”>body{font-family:Verdana, Arial, Helvetica, sans-serif; font-size:11px}
h1, h2{font-size:20px;}</style>

<script type=”text/javascript”>
$(document).ready(function()
{
$(“#paradigm_all”).click(function()
{
var checked_status = this.checked;
$(“input[name=paradigm[]]”).each(function()
{
this.checked = checked_status;
});
});
});

//initiate validator on load
$(function() {
// validate contact form on keyup and submit
$(“#userForm”).validate({
//set the rules for the field names
rules: {
first_name: {
required: true,
minlength: 2
},
last_name: {
required: true,
minlength: 2
},
email: {
required: true,
email: true
},
company: {
required: true,
minlength: 2
},
},
//set messages to appear inline
messages: {
first_name: “*Please enter First Name”,
last_name: “*Please enter Last Name”,
email: “*Please enter a valid Email address”,
company: “*Please enter Company Name”
}
});
});

</script>
<style type=”text/css”>
.error {
color: red;
font: 12pt verdana;
padding-left: 10px
}
</style>
</head>
<body>

<h1>jQuery Tutorial: Multiple Checkbox values & Validation of FORM </h1>
<p>You will learn how to select/deselect all checkbox and get all the values of checked box.<br/>
This will also teach you to validate your FORM using JQUERY validate.js.
</p>
<br/><br/>
<?php
if(isset($_POST) && !empty($_POST))
{
var_dump($_POST);
}
?>
<form name=”myform” action =”#” id=”userForm” method=’post’ enctype=’multipart/form-data’>
<label for=”first_name”>First Name</label><br />
<input name=”first_name” id=”first_name” /><br />
<label for=”last_name”>Last Name</label><br />
<input name=”last_name” id=”last_name” /><br />
<label for=”email”>Email address/Username</label><br />
<input name=”email” id=”email” /><br />
<label for=”company”>Company</label><br />
<input name=”company” id=”company” /><br /><br />
<label>Role</label><br/>
<input type=”checkbox” name=”paradigm[]” value=”Imperative”>Imperative<br/>
<input type=”checkbox” name=”paradigm[]” value=”Object-Oriented”>Object-Oriented<br/>
<input type=”checkbox” name=”paradigm[]” value=”Functional”>Functional<br/>
<input type=”checkbox” id=”paradigm_all”>Select All<br><br />
<input type=”submit”  value=”save” />

</body>
</html>

Drupal 6 Installation on windows

DRUPAL INSTALLATION

1.UNZIP  Drupal-6.15 and rename folder drupal-6.1.5 to drupal and copy that in your server webroot
I am using XAMPP , so I kept this “drupal”  folder in “htdocs” folder
Start your Xampp server.
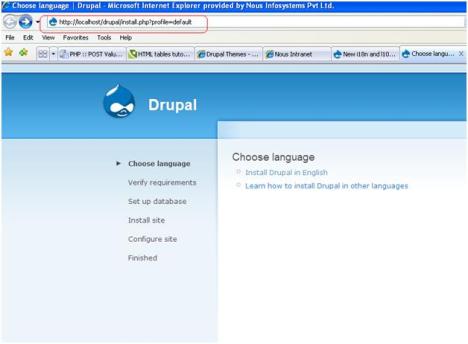
On browser , type:-
http://localhost/drupal
it will show this page as in screenshot
2.Follow drupal instructions
Choose language to English

1

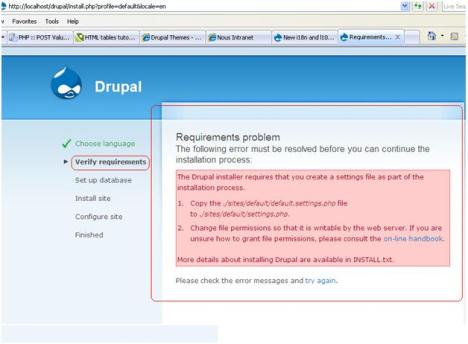
3. After that you will get this screen

2

3

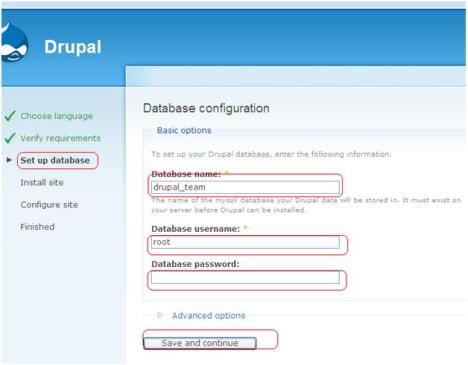
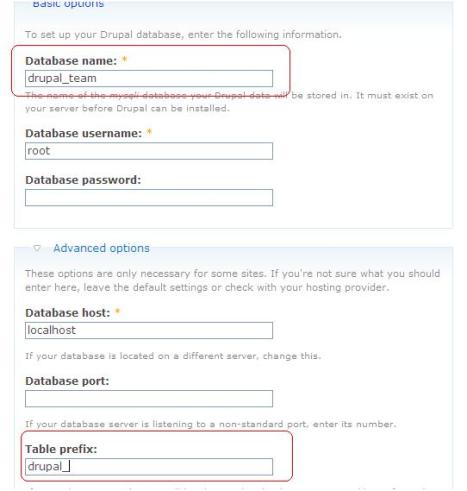
4.You will get screen like below and enter your DB name and all , after that click on ” SAVE AND CONTIUNE “ button

4

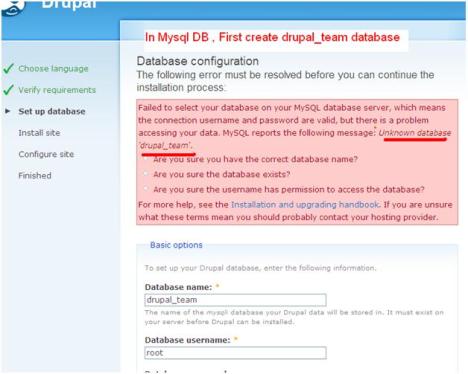
5. After that you will see screen as shown below .
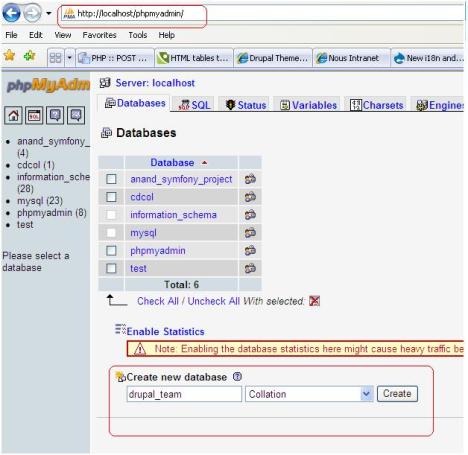
This prompt error message because we don’t have “drupal_team”  database in MYSQL DB

5

 First create “drupal_team” db in MYSQL database
As  shown in screenshot

6

After creating DB name in MYSQL

6.Goto drupal installation browser
 
NOTE:- if u want then put prefix for your tables in “drupal_team” database. Its optional
See screenshot:-

7

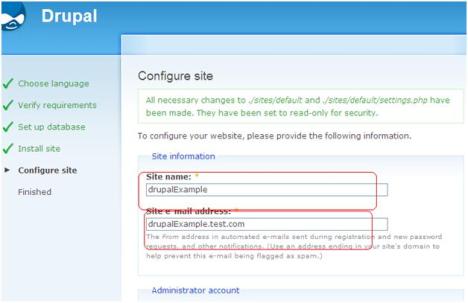
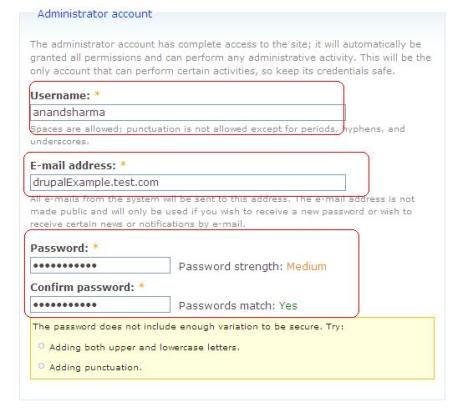
7. after that we will see screen as shown and fill appropriate data .

8

9
10

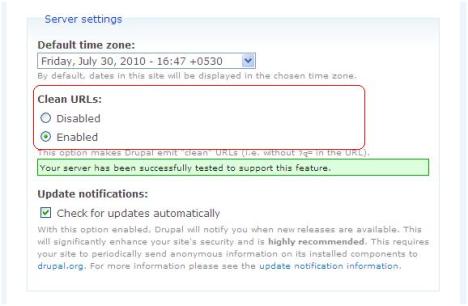
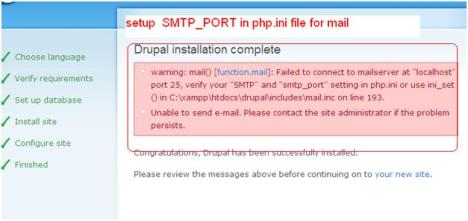
8. AT last you will see screen as shown below , SMTP error will come but its just for mailing functionality which you can resolve in php.ini file.

11

Beautiful paintings

JQuery Table Sorter Plugin

TableSorter plugin is used to do single column sorting as well as multiple column sorting without refreshing a whole page .

Here is a small Example to show  how Tablesorter plugin works.

STEP 1:-
download jquery.js and jquery-tablesorter.js file

STEP 2:- Embedd that js file into your source code or in your webpage.

Between  <HEAD></HEAD> tag , copy these lines

<script type=”text/javascript” src=”/path/to/jquery.js”></script>
<script type=”text/javascript” src=”/path/to/jquery.tablesorter.js”></script>

NOTE:- provide jquery.js and jquery-tablesorter.js path in src attribute

STEP 3:- Between  <BODY></BODY> tag, copy these lines and paste


<h1><u>Multiple Column Sorting  Example</u></h1>

<table  cellpadding=”3″ cellspacing=”1″  width=”100%”  id=”myTable”>
<thead >
<tr><th  width=”60″ >Name</th>
<th width=”60″>Task</th>
<th  width=”60″>Cell No.</th>
<th  width=”60″>Start Date</th>
<th  width=”60″>End Date</th>
<th  width=”60″>Completed By</th>
</tr>
</thead>
<tbody>
<tr><td>
Anand
</td>
<td>
PHP
</td>
<td>
111-222-3333
</td>
<td>
11/16/2009
</td>
<td>
11/23/2009</td>
<td>
ak60991
</td>
</tr>
<tr>
<td>
Vishal
</td>
<td>
Coldfusion
</td>
<td>
111-222-3334
</td>
<td>
11/16/2009
</td>
<td>
11/23/2009</td>
<td>
vu60998
</td>

</tr>
<tr>
<td>
Anand
</td>
<td>
Coldfusion
</td>
<td>
111-222-3334
</td>
<td>
11/16/2009
</td>
<td>
11/23/2009</td>
<td>
ak60991
</td>

</tr>
<tr>
<td>
Himadri
</td>
<td>
Coldfusion
</td>
<td>
111-222-3334
</td>
<td>
11/16/2009
</td>
<td>
11/23/2009</td>
<td>
hr60001
</td>

</tr>

<tr>
<td>
Gaurav
</td>
<td>
Coldfusion
</td>
<td>
111-222-3336
</td>
<td>
11/16/2009
</td>
<td>
11/23/2009</td>
<td>
gt56001
</td>
</tr>
<tr>
<td>
Himadri
</td>
<td>
Oracle
</td>
<td>
111-222-3336
</td>
<td>
11/16/2009
</td>
<td>
11/23/2009</td>
<td>
gt56001
</td>
</tr>
<tr>
<td>
Vishal
</td>
<td>
Oracle
</td>
<td>
111-222-3336
</td>
<td>
11/16/2009
</td>
<td>
11/23/2009</td>
<td>
vu60998
</td>
</tr>

</tbody>
</table>
<p><span><font color=”#990000″ size=”+1″><b>NOTE:</b></font></span> hold  shift key and click on  multiple headers/columns to do multiple column sorting!</p>


STEP 4:-Between <HEAD></HEAD> tag , copy and paste these lines

<script type=”text/javascript”>
<!–jQuery.noConflict();–>
var $j = jQuery.noConflict();

$j (document).ready(function()     {
//$j (“#myTable”).tablesorter({widgets: [‘zebra’]});

$j (“#myTable”).tablesorter();
}
);
</script>


Description:

this particular script will apply tablesorter() function of JQuery to table which has id ‘myTable’


STEP 5:- Add CSS style sheet into your code .

Copy and paste these lines between <HEAD></HEAD> tag


<style type=”text/css”>
.sort{font-size:9px;}

table.tablesorter .header {
background-image: url(“/path/to/bg.png”);
background-repeat: no-repeat;
padding-left: 30px;
padding-top: 8px;
width:auto;
}

table.tablesorter th.no_sort {
background-image: url(“/path/to/header.PNG”);
}
table.tablesorter .headerSortUp {
background-image: url(“/path/to/asc.png”);
background-repeat: no-repeat;
}
table.tablesorter .headerSortDown {
background-image: url(“/path/to/desc.png”);
background-repeat: no-repeat;
}
table.tablesorter .even {
background-color: #9999CC;
}
table.tablesorter .odd {
background-color: #FFFFFF;
}
</style>


Save your code and run it . Congrats you have implemented sorting on your table .

Screenshot is added


FEW Tips: open JQuery-tablesorter.js file,

you will see  some default values , you can change these values based on your requirements.i have commented on some parameters in below code .

this.defaults = {
cssHeader: “header”,// css header class
cssAsc: “headerSortUp”, // css headerSortUp class
cssDesc: “headerSortDown”, // css headerSortDown class
sortInitialOrder: “asc”, // you can change it based on how you want initial sorting
sortMultiSortKey: “shiftKey”,// here you can use CTRL key also
sortForce: null,
sortAppend: null,
textExtraction: “simple”,
parsers: {},
widgets: [‘zebra’],
widgetZebra: {css: [“even”,”odd”]},// css even ,odd class
// below commented code will disable sorting on first and second column
//headers: {0: { sorter: false}, 1: {sorter: false}},
headers: {},
widthFixed: false,
cancelSelection: true,
sortList: [],
headerList: [],
dateFormat: “us”,
decimal: ‘.’,
debug: false
};


LIGHTBOX Tutorial

Lightbox is a useful JavaScript, which allows you to watch photos in a semi-transparent overlay to your site. When you click on a link, the picture is shown above the content of your page, which frees you of limitations like columns.

This tutorial is about setting up Lightbox to work on your page.

STEP 1: download lightbox.js , lightbox.css ,prototype.js,scriptaculous.js,effects.js and builder.js


STEP 2: Create a folder “launchpad” and “js” , “css” and “image” sub folder inside “launchpad” folder.

NOTE:- you can create a folder structure according to your wish also .

In “js” folder , keep all js files like:

lightbox.js ,prototype.js,scriptaculous.js,effects.js and builder.js

In “css” folder . keep lightbox.css file.

In “images” folder , keep all your images that you want to be displayed as photo gallery.

STEP 3: keep “lauchpad” folder inside C:\ drive

NOTE:- you can put this folder anywhere according to your wish but then you have to take care of Path of these folder.

STEP 4: Create lightbox.html page (you can rename your filename also.)

source code of lightbox.html :-


<html>
<head>
<title> Lightbox Example</title>
<link rel=”stylesheet” href=”c:/lightbox/css/lightbox.css” type=”text/css” media=”screen” />

// Lightbox.css :- for lightbox layout designing
<br/>
<script src=”c:/lightbox/js/prototype.js” type=”text/javascript”></script>
//prototype.js :-This will call to a needed Javascript file, ‘prototype.’ Without prototype, Lightbox WILL NOT function.
<br/>

<script src=”c:/lightbox/js/scriptaculous.js?load=effects,builder” type=”text/javascript”></script>

//scriptaculous.js :- Above statement  Not only  it calls to scriptaculous, but it will also call to effects.js and builder.js. Scriptaculous has a feature that will load the needed JS files with itself, hence the ?load after scriptaculous.js

<br/>

<script src=”c:/lightbox/js/lightbox.js” type=”text/javascript”></script>
//Lightbox.js

</head>
<body>
<h1>Light Box Example</h1>
<br/><br/>
<a href=”c:/lightbox/images/a.jpg” rel=”lightbox” title=”Gallery”>What is it?</a><br/><br/>

// The beauty of Lightbox is that you only need to call to it in link attributes, and not image attributes. <br/>
// rel=”lightbox” tells the webserver that the relation of this link is Lightbox, so, it will link Lightbox.js and all other JS files to the link. <br/>
// Title is optional, it will be displayed below the image<br/>
// Now, we’ll link some images together, commented code will be after so you understand.<br/>

<br/><br/>

<a href=”c:/lightbox/images/a.jpg” rel=”lightbox[outdoors]”>Gallery 1</a><br/>
<a href=”c:/lightbox/images/b.jpg” rel=”lightbox[outdoors]”>Gallery 2</a><br/>
<a href=”c:/lightbox/images/c.jpg” rel=”lightbox[outdoors]”>Gallery 3</a><br/>
<a href=”c:/lightbox/images/d.jpg” rel=”lightbox[outdoors]”>Gallery 4</a><br/>
<a href=”c:/lightbox/images/e.jpg” rel=”lightbox[outdoors]”>Gallery 5</a><br/>
<br/><br/>
//Everything is the same as above, except that we’ve added within brackets the word ‘outdoors.’ Outdoors links those five images together so that we will get ‘Next’ and/or ‘Previous’ linkings within Lightbox.
</body>
</html>

copy and paste this code into lightbox.html file

NOTE: –

<a href=”c:/lightbox/images/a.jpg” rel=”lightbox[outdoors]”>Gallery 1</a><br/>
<a href=”c:/lightbox/images/b.jpg” rel=”lightbox[outdoors]”>Gallery 2</a><br/>
<a href=”c:/lightbox/images/c.jpg” rel=”lightbox[outdoors]”>Gallery 3</a><br/>
<a href=”c:/lightbox/images/d.jpg” rel=”lightbox[outdoors]”>Gallery 4</a><br/>
<a href=”c:/lightbox/images/e.jpg” rel=”lightbox[outdoors]”>Gallery 5</a><br/>

In the above code ,

you   can rename your image name as well as you can use “n”  number of images that has to be displayed.

suppose , i can add other statement in above code,like this

<a href=”c:/lightbox/images/hello.jpg” rel=”lightbox[outdoors]”>Gallery 6</a>

STEP 5: In lightbox.css,

change  path of images for these attributes

fileLoadingImage:        ‘c:/lightbox/images/loading.gif’,     
 fileBottomNavCloseImage: ‘c:/lightbox/images/closelabel.gif’,

STEP 6: run lightbox.html page and click on  any of links to see lightbox effects .


PHP Magic Methods

MAGIC METHODS

1.Why magic methods ?

Ans:

In PHP,  a variable can take any form depending on the data passed to it. Also PHP automatically creates variable and assigns values to it even if the variables are not defined. But in Object Oriented Programming all the data members/methods needs to be defined. To solve some of these problems in OOPS environment magic methods have been introduced in PHP5.

  1. Magic methods are member function that is available for all instance of class.
  2. Magic method stars with __(double underscore), like: __get () ,__set()
  3. Magic methods are always declared as PUBLIC.

LIST of MAGIC METHODS used in PHP 5 :

__get() , __set() , __autoload , __sleep() , __wakeup() , __construct() , __destruct() , __isset() , __unset() , __clone , __call ,__toString()

1. __construct() :- This methods gets called whenever an object of a class is instantiated.

2. __destruct() :–  This methods gets called whenever an object of a class is destroyed or object goes out of scope.

3. __set() :–  This methods get automatically called whenever you assigns data to a undefined attributes of an class in PHP 5. With this method the programmer can keep track on the variables which are not defined inside the class.

    Syntax:

    < ?

    function __set($data,$value){

    //$data – holds the name of the undefined attributes

    //$value – holds the value assigned to the undefined attributes.

    }

    ?>

    Example:

    < ?
    class magicmethod{
                   function __set($data,$value)
                   {
                                   echo "Error assigning values to undefined attributes";
                                   echo "attributes Called:".$data;
                                   echo "Value assigned to attributes:".$value;
                   } 
    }
    $a = new magicmethod();
    $a->setData = 20;
    ?>
    In Above example : 

      Output:
      Error assigning values to undefined attributes
      attributes Called:setData
      Value assigned to attributes:20

      Explain:

      In the magicmethod class setData is not defined so the php compiler excutes __set() magic method and displays error message.

      And  assigned value 20 to an attribute setData of magicmethod class.

      5. __get() :- This methods get automatically called when you try to retrieves the data of undefined attributes of an class in PHP 5.

        Syntax:

        function __get($data)
        {
             //$data holds the name of the undefined attributes getting called.
        }
          
        Example:
        < ?
        class magicmethod
        {
           function __get($data)
           {
               echo "Error accessing undefined attributes";
               echo "attributes Called:".$data;
           }
        }
         
        $a = new magicmethod();
        echo $a->setData;
         
        ?>
         
        Output:
        Error accessing undefined attributes
        attributes Called:setData
         
        Explain: 
        a.echo an attribute setData of magicmethod class.
        b.But in the magicmethod class setData is not defined so the php compiler excutes __get() magic method and displays error message 
        
        6.__cal() :- The __call Magic method in PHP5 get called when accessing an undeclared or undefined methods of an class. With this magic method the programmer can keep track on the undeclared method which are not defined inside the class.

          Syntax:

          < ?
          function __call($data,$argument)
          {
                         //$data holds the name of the undefined method getting called.
                  //$argument holds the argument passed to the method.
          }
          ?>

          Example:

          < ?
          class magicmethod
          {
           
                         function __call($data,$argument)
                         {
                                         echo "Error accessing undefined Method";
                                         echo "Method Called: ".$data;
                                         echo "Argument passed to the Method: ".$argument;
                         }
           
          }
           
          $a = new magicmethod();
          echo $a->setData();  //Calling setData method
           
          ?>

          Output:
          Error accessing undefined Method
          Method Called: setData
          Argument passed to the Method: Array (Array of the Argument Passed)

          Explain:

          1.trying to call setData method of magicmethod class.

          2.Now in the magicmethod class setData is not defined so the php compiler excutes __call() magic method and displays error message.


          6. __sleep() :-  This methods gets called when you serialize the object in PHP 5. Serializing is required to pass complex data across the network or PHP pages. It is also used to store data(files, database, cookies etc).

            Syntax:

            < ?
            function __sleep()
            {
                           ...
                           return serialised data;
            }
            ?>

            Example:

            < ?
            class magicmethod
            {
                           function __sleep()
                           {
                                           echo "Performing Clean-Up Operation Before Serializing Data ";
                                           return array("Serialized Data","1","2","3");
                           }
            }
            $a = new magicmethod();
            $serializedata = serialize($a);
            echo $serializedata;
            ?>

            Output:
            Performing Clean-Up Operation Before Serializing Data
            O:11:”magicmethod”:4:{s:15:”Serialized Data”;N;s:1:”1″;N;s:1:”2″;N;s:1:”3″;N;}

            Explain:

            a.trying to serialize the object of magicmethod class.

            b.Now the PHP Compiler calls the __sleep() Magic method which return an array having the serialized values

            7.__wakeup() :- This methods gets called when the object is about to be unserialized in PHP 5. This method allows us to restore the serialized data to its normal form.

            Syntax:

            function __wakeup()
            {
                           ...
            } 
            

            Example:

            < ?
            class magicmethod
            {
                           private $setName;
                           function __sleep()
                           {
                                           echo "Performing Clean-Up Operation Before Serializing Data ";
                                           $this->setName = "Hello World!!!";
                                           return array(setName);
                           }
             
                           function __wakeup()
                           {
                                           echo "Performing Clean-Up Operation Before Unserializing Data ";
                                           echo $this->setName;
                           }
            }
            $a = new magicmethod();
            $serializedata = serialize($a);
            $serializedata1 = unserialize($serializedata);
            ?>

            Output:
            Performing Clean-Up Operation Before Serializing Data
            Performing Clean-Up Operation Before Unserializing Data
            Hello World!!!

            Explain:

            a.trying to serialize the object of magicmethod class

            b.Now the PHP Compiler calls the __sleep method which return an array having the serialized values

            c. After serialize data, i am calling the unserialize function; now the PHP compiler will call the __wakeup method which contains the original data that was serialized .

            8. __autoload():-This methods get automatically called whenever you try to load an object of class which resides in separate file and you have not included those files using include,require and include_once. To use this method it is mandatory to the PHP filename as that of the class name because this methods accepts the class name as the argument.

              Syntax:

              < ?
                 function __autoload($classname)
                 {
                    require($classname.".php");
                 }
              //$classname is the name of the Class.
              ?>

              Example:

              //magicmethod1.php

              < ?
                  class magicmethod1
                  {
                      function __construct()
                      {
                          echo "MagicMethod1 Class Called";
                      }
                  }
                ?>
              <?php
                  function __autoload($classname)
                  {
                      include $classname.".php"; //Here $classname=magicmethod1
                  }
               
                  $a = new magicmethod1();
              ?>

              Output: MagicMethod1 Class Called

              Explain:

              trying to create an object of magicmethod1 class, but i have not included the magicmethod1.php so PHP compiler calls the __autoload() method which include that magicmethod1.php file.

              9.__clone() :- PHP5 has introduced clone method which creates an duplicate copy of the object. __clone methods automatically get called whenever you try to call clone methods in PHP 5. This operator does not creates a reference copy.

                In PHP 5 when you assign one object to another object creates a reference copy and does not create duplicate copy. This would create a big mess as all the object will share the same memory defined for the object. To counter this PHP 5 has introduced clone method

                Example:

                //without cloning

                < ?
                class Animal
                {
                   public $name;
                   public $legs;
                 
                   function setName($name)
                   {
                               $this->name = $name;
                   }
                 
                   function setLegs($legs)
                   {
                               $this->legs = $legs;
                   }
                }
                 
                $tiger = new Animal();
                $tiger->name = "Tiger";
                $tiger->legs = 4;
                 
                $kangaroo = $tiger;
                $kangaroo->name = "Kangaroo";
                $kangaroo->legs = 2;
                 
                echo $tiger->name."---".$tiger->legs;
                echo "<br />".$kangaroo->name."---".$kangaroo->legs;
                ?>

                Output:
                Kangaroo—2
                Kangaroo—2

                Explanation:

                • Here i have created an $tiger object of Animal class
                • Created another variable $kangaroo and assigned $tiger to $kangaroo
                • After echo it print the details entered last because both the variables are referring to the same memory location

                Example:

                //with __Clone

                < ?
                class Animal
                {
                   public $name  ;
                   public $legs;
                 
                   function setName($name)
                   {
                               $this->name = $name;
                   }
                 
                   function setLegs($legs)
                   {
                               $this->legs = $legs;
                   }
                 
                   function __clone()
                   {
                               echo "<br />Object Cloning in Progress";
                   }
                }
                 
                $tiger = new Animal();
                $tiger->name = "Tiger";
                $tiger->legs = 4;
                 
                $kangaroo = clone $tiger;
                $kangaroo->name = "Kangaroo";
                $kangaroo->legs = 2;
                 
                echo "<br />".$tiger->name."---".$tiger->legs;
                echo "<br />".$kangaroo->name."---".$kangaroo->legs;
                ?>

                Output:
                Object Cloning in Progress
                Tiger—4
                Kangaroo—2

                Explanation:

                • Here i have created an $tiger object of Animal class
                • Created another variable $kangaroo having clone of $tiger. This calls the __clone magic method
                • After echo it print the details entered by individual object as both of them are referring to separate object and memory location

                The above technique of cloning discussed is called shallow copy. There are other techniques called Deep Copy wherein you create duplicate copy of objects referring to other objects etc.

                10. __toString() :- __toString method is called when PHP needs to convert class instances into strings, for example when echoing:

                <?php

                class SomeClass {
                public function __toString() {
                return ‘someclass’;
                }
                }

                $obj = new SomeClass();
                echo $obj;
                //will output ‘someclass’

                ?>

                11. __isset() :- This methods get automatically called whenever you try to check the existence of the undeclared attributes of the class using isset function of PHP.

                12. __unset() :- This methods get automatically called whenever you try to check the destroy or clear an undeclared attributes of the class using unset function of PHP

                ORM (Object Relational Mapping)

                ORM in  PHP

                Advantages:

                1. ORMs have their own APIs for building queries and so are less Vulnerable to SQL injection attacks.
                2. ORMs have tools that will inspect a schema and build up a set  of model classes that allow you to interact with object in db.
                3. Instead of Directly interacting with db , you’ll be interacting with an abstraction layer that provides insulation between code and database Implementation.
                4. It provides mapping between logical business model and physical storage model.
                5. Cache management recently used data are cached in memeory so that it will reducing load on DBs.
                6. Concurrency support: support for multiple user updating same data simultaneously.

                Disadvantages:

                1. If you have complex, hand tuned SQL
                2. If you have decided that your DB will have stored procedure as its interface.
                3. If you have a complex schema that can’t be replaced.
                4. If you have not dealing with object
                5. If you are using custom queries oftenly.
                6. Tight coupling:  This approach creates tight dependency between model objects and database schemas. Changing in DB Schema has rippling affects in objects model and mapping configuration & vice-versa.  

                PHP & ORACLE

                PHP &  ORACLE

                Introduction to ORACLE : –  Oracle DB is well known for scalability , reliability and features.It is a leading DB and is available on many platforms.

                Oracle Terminology:  

                1. 1.       Databases and Instances :-  Oracle databases store and retrieve data. Each database consists of one or more data files. An Oracle database server  consists of an Oracle database and an Oracle Instance. Whenever an Oracle database server is started , a shared memory region SGA(System Global Area) is allocated and Oracle background processes are started. Combination of background processes and SGA is called an Oracle Instance.   
                2. 2.       Tablespaces :-  Tablespaces are logical unit of data storage made up of one or more datafiles. 
                3. 3.       Schemas:- A Schema is a collection of database objects such as tables and indexes. Typically, a single DB contains multiple schemas. Multiple Application can use same DB without any conflicts by using   different schemas. Instead of using a CREATE DATABASE command for new application , use CREATE USER to create a new schema in the database. 

                PHP ORACLE EXTENSIONS

                PHP has several extensions that let application use Oracle DB. Database access  and abstract library in each extension of PHP   is fundamentally similar. The differences are in  support for advanced features and programming methodology.

                If you want to make full use of Oracle features and need high performance, PHP OCI8 extension  has to be used. PHP OCI8 is a main ORACLE Extension.

                If you want database independence , use PHP PDO(data object) or ADOdb extension for database abstraction.


                PHP Oracle Extensions

                1.Oracle (Not recommended)

                2.OCI8

                3.PDO

                4.ODBC

                PHP Oracle extensions are written in C  and linked into PHP Binary.


                OCI8 Extension :- OCI8 Extension is recommended extension to use. It is used in PHP 3,4 and 5.

                Example:

                <?php

                $con=oci_connect(‘dbname’,’passwd’,’localhost/XE’);

                $s=oci_parse($con,’select * from User’);

                oci_execute($s);

                While($res=oci_fetch_array($s,OCI_ASSOC)){

                echo $res[‘name’];

                }

                ?>

                HOW TO GET OCI8 EXTENSION

                Bundle Containing OCI8 Location and Current Release
                1. PHP Source Code
                http://www.php.net/downloads.phpphp-5.2.7.tar.bz2
                1.  PECL Source Code
                http://pecl.php.net/package/oci8oci8-1.3.4.tgz
                1.  Zend Core for Oracle 2.5
                http://www.oracle.com/technology/tech/php/zendcore/ZendCoreForOracle-v2.5.0-Linux-x86.tar.gz

                ZendCoreforOracle-v.2.5.0-Windows-x86.exe


                Oracle has cross-version compatibility, that means if PHP OCI8 is linked with Oracle10g  Client Libraries, then it can able to connect with Oracle database  8i,9i,10g,11g. If OCI8 is linked with oracle 11g client libraries then it can able to connect with Oracle9iR2 onwards  .

                Full OCI8 functionality may not be available unless Oracle client libraries and database servers are latest version.

                OCI8 and Oracle Compatibility Matrix

                Software Bundle PHP Version OCI8 VersionIncluded Oracle Client Libraries Usablewith OCI8
                PHP Release Source Code Current release is 5.2.7 OCI8 1.2.5 8i, 9i, 10g, 11g
                PECL OCI8 Source Code Builds with PHP 4.3.9onwards Latest release isOCI8 1.3.4 9iR2, 10g, 11g
                Zend Core for Oracle 2.5 Includes PHP 5.2.5 OCI8 1.2.3 Inbuilt Oracle Database 10g client
                       

                ORACLE DATABASE XE :-

                Oracle database XE (Oracle 10g ) is available on 32-bit Windows and Linux platform.Oracle DatabseXE is available on Oracle network http://otn.oracle.com/xe

                Oracle Database XE has a browser based management interface, Oracle Application Express.

                Installing Oracle Database XE on Windows

                REFER :- http://www.oracle.com/technology/tech/php/pdf/underground-php-oracle-manual.pdf

                REFERENCE :- http://www.oracle.com/technology/tech/php/pdf/underground-php-oracle-manual.pdf

                Cloud Computing

                Cloud Computing : –  It refers to the Utilization of shared , elastic resources and processing power accessed via Internet.

                Cloud based developement means , outsourcing of various parts of application out of server & into the cloud.

                Instead of storing Images , Videos , Audio or other files into File system , thay are stored in Cloud.

                Instead of using Local server DB , a cloud-based DB is used.

                Batch – processing and other functionalities are also performed on Cloud.

                Most significant benefit of course is that Cloud’s capacity is theoretically limitless as compared to some Local servers.

                Amazon Cloud related offerings are EC2 ,S3 and Cloud Front

                EC2 :- elastic compute cloud , it allows developers to start instances of servers & control them via web services interface.

                S3 :- provides storage on cloud.

                Cloud Front :- S3 objeccts are esaily achieved via Cloud Front

                Working with Selenium-IDE & Running PHP Unit tests

                Working with Selenium-IDE | Running Functional Tests | Runnig PHP Unit Tests

                Selenium IDE is an integrated development environment for Selenium tests. It is implemented as a Firefox extension, and allows you to record, edit, and debug tests. Selenium IDE includes the entire Selenium Core, allowing you to easily and quickly record and play back tests in the actual environment that they will run.

                Selenium IDE is not only recording tool: it is a complete IDE. You can choose to use its recording capability, or you may edit your scripts by hand. With auto-complete support and the ability to move commands around quickly, Selenium IDE is the ideal environment for creating Selenium tests no matter what style of tests you prefer.

                1. Download selenium IDE from
                http://selenium-ide.openqa.org/download.jsp

                This will directly add IDE as fire-fox add-ons.
                https://addons.mozilla.org/en-US/firefox/addon/2079
                2. Start Firefox and then Start Selenium IDE: Tools->Selenium IDE.

                You will see the following window.

                3. Enter base url or open the site on which you want to perform functional testing.
                IDE will directly open in play mode with the entry of base url as below. Here we want to perform testing on
                http://www.offshoresoftwaredevelopmentindia.com/

                4. After starting the IDE now simply browse the site. It� makes entry in the table as below

                Now the entire test is like

                Now stop recording by pressing red button.

                In html format it looks like

                We can export this file in any format we want as

                In PHP format it looks as

                5. Now to run the recorded test open new browser and press the green – play button

                6. The test will run as follow

                7. If there will be any error then that test will be highlighted by red line as

                8. If you are on a slow internet connection than it may help to slow the test speed.

                9. You can save the test case in php as follow..

                Required changes in the exported PHP file is as follow

                a. Change the class name same as stored file name as default class name will be ?Example?.
                b. Enter the web-site name in the
                $this->setBrowserUrl(”
                http://change-this-to-the-site-you-are-testing/“);
                Field.
                c. Available browser options are
                *iexplore
                *konqueror
                *firefox
                *mock
                *pifirefox
                *piiexplore
                *chrome
                *safari
                *opera
                *iehta
                *custom
                That is write as follow
                $this->setBrowser(”*chrome”);
                (When we define browser as chrome then no need to get security certificate but in case of firefox or iexplore we need to take certificate. )

                10. Downloading and installing Selenium RC
                Selenium RC is a Java based command line server that starts browsers and runs commands you pass from your tests.

                a. First make sure you have a Java runtime installed on your machine.
                Otherwise download it from
                http://www.java.com/en/download/manual.jsp
                http://java.sun.com/javase/6/docs/technotes/guides/jweb/otherFeatures/jre_install.html
                Test the version of JRE by entering command on command line as ?
                java -version
                b. Download Selenium RC from
                http://selenium-rc.seleniumhq.org/download.html.
                c. After extracting the files from the archive copy the ?selenium-server.jar? file to any directory you feel appropriate.
                d. Start the Selenium RC server from the command-line by issuing the following command:
                java -jar selenium-server.jar
                This will start the server on port 4444.
                e. Now the server is ready to accept test commands from your PHP script. Make sure you keep this server running till you finish testing.

                11. Changes in selenium-server.jar file requires to run in Firefox is as below:

                a. Open selenium-server.jar using winrar
                b. locate 2 dirs: customProfileDirCUSTFFCHROME and customProfileDirCUSTFF
                c. recursively explore each of those dirs, and when you find a file called install.rdf drag it to some temp location, and edit the following line:
                <em:maxVersion>2.0.0.*</em:maxVersion>
                change it to:
                <em:maxVersion>4.0.0.*</em:maxVersion>
                d. drag the install.rdf back into the archive and overwrite the old one.
                e. do this for all the install.rdf files in those 2 dirs.

                12. Installing PHPUnit
                a. An easy way to install PHPUnit is to use the PEAR installer. The PEAR channel (pear.phpunit.de) is used to distribute PHPUnit so make sure that it is registered with your local PEAR environment:
                pear channel-discover pear.phpunit.de
                After the channel is registered install PHPUnit:
                pear install phpunit/PHPUnit
                Actual testing

                Now that PHPUnit is installed and the Selenium RC server is up and running, it?s time to run our test we saved before in our ?Example.php? file. Type the following on your command-line:
                phpunit Example

                13. This will start the test. The PHPUnit Selenium driver will execute each test command from your file and send it to the Selenium server, which does the job of launching the appropriate browser, opening web pages, and performing various specified actions; and closing the browser after the test completes.

                This will open new browser as

                After successful execution the output will be as


                REFERENCE:

                http://www.offshoresoftwaredevelopmentindia.com/blog/category/php-development/

                Akela Hu

                pathik aaye pathik gaye ,
                par hu isthir achal mein ..
                Naa chahat naa umang mujh mein
                Phir bhi hathi sthamb hu mein ..

                dhanye hai woh pathik ,
                jisne karuna samjhi meri
                ehsas kiya mere hone ko
                aur jeevan ka saar bhara

                Pathik likhna mera jeevan
                Jisme kabhi khusiya bhi
                panchiyo ki kilkariya thi
                aur fuloo se bhara mera daaman tha

                tab harek pathik mujhe niharta jata
                aur mere rang roop ki bayakhya karta
                woh dekh suun mein bhi shaan mei jhulta
                mud mast hoke hawaoo se larta

                badal se larta jahgarta mein
                sabko bundo ke geet sunata
                bejali ki chamak ko vish pyala samjh kar
                khuud sevan karta jata mein

                karakti dhup mei pathiko ko chaya deta mein
                aur khud ussme jalta mein
                meri teheniyo, pattoo ko thod ghar banate
                panchiyo ko aashrye deta mein

                magar aab mein akela , bebash hu
                sab ne aapni rahein khojh lii
                par mein yehi hu kisi ke intezaar mei
                zindagi ke baache pal aate hi hoge !!!!

                Anand Sharma

                जीवन की आपाधापी में

                जीवन की आपाधापी में कब वक़्त मिला

                कुछ देर कहीं पर बैठ कभी यह सोच सकूँ

                जो किया, कहा, माना उसमें क्या बुरा भला।

                जिस दिन मेरी चेतना जगी मैंने देखा

                मैं खड़ा हुआ हूँ इस दुनिया के मेले में,

                हर एक यहाँ पर एक भुलाने में भूला

                हर एक लगा है अपनी अपनी दे-ले में

                कुछ देर रहा हक्का-बक्का, भौचक्का-सा,

                आ गया कहाँ, क्या करूँ यहाँ, जाऊँ किस जा?

                फिर एक तरफ से आया ही तो धक्का-सा

                मैंने भी बहना शुरू किया उस रेले में,

                क्या बाहर की ठेला-पेली ही कुछ कम थी,

                जो भीतर भी भावों का ऊहापोह मचा,

                जो किया, उसी को करने की मजबूरी थी,

                जो कहा, वही मन के अंदर से उबल चला,

                जीवन की आपाधापी में कब वक़्त मिला

                कुछ देर कहीं पर बैठ कभी यह सोच सकूँ

                जो किया, कहा, माना उसमें क्या बुरा भला।

                मेला जितना भड़कीला रंग-रंगीला था,

                मानस के अन्दर उतनी ही कमज़ोरी थी,

                जितना ज़्यादा संचित करने की ख़्वाहिश थी,

                उतनी ही छोटी अपने कर की झोरी थी,

                जितनी ही बिरमे रहने की थी अभिलाषा,

                उतना ही रेले तेज ढकेले जाते थे,

                क्रय-विक्रय तो ठण्ढे दिल से हो सकता है,

                यह तो भागा-भागी की छीना-छोरी थी;

                अब मुझसे पूछा जाता है क्या बतलाऊँ

                क्या मान अकिंचन बिखराता पथ पर आया,

                वह कौन रतन अनमोल मिला ऐसा मुझको,

                जिस पर अपना मन प्राण निछावर कर आया,

                यह थी तकदीरी बात मुझे गुण दोष न दो

                जिसको समझा था सोना, वह मिट्टी निकली,

                जिसको समझा था आँसू, वह मोती निकला।

                जीवन की आपाधापी में कब वक़्त मिला

                कुछ देर कहीं पर बैठ कभी यह सोच सकूँ

                जो किया, कहा, माना उसमें क्या बुरा भला।

                मैं कितना ही भूलूँ, भटकूँ या भरमाऊँ,

                है एक कहीं मंज़िल जो मुझे बुलाती है,

                कितने ही मेरे पाँव पड़े ऊँचे-नीचे,

                प्रतिपल वह मेरे पास चली ही आती है,

                मुझ पर विधि का आभार बहुत-सी बातों का।

                पर मैं कृतज्ञ उसका इस पर सबसे ज़्यादा –

                नभ ओले बरसाए, धरती शोले उगले,

                अनवरत समय की चक्की चलती जाती है,

                मैं जहाँ खड़ा था कल उस थल पर आज नहीं,

                कल इसी जगह पर पाना मुझको मुश्किल है,

                ले मापदंड जिसको परिवर्तित कर देतीं

                केवल छूकर ही देश-काल की सीमाएँ

                जग दे मुझपर फैसला उसे जैसा भाए

                लेकिन मैं तो बेरोक सफ़र में जीवन के

                इस एक और पहलू से होकर निकल चला।

                जीवन की आपाधापी में कब वक़्त मिला

                कुछ देर कहीं पर बैठ कभी यह सोच सकूँ

                जो किया, कहा, माना उसमें क्या बुरा भला।

                RSS(Really simple Syndication)

                RSS stands for Really Simple syndication / Rich Site Summary .

                RSS is used to get standard data format for communicating news , any updates or any thing that indiviual or organisation want to syndicate with large audience .

                RSS is an XML format that consists of designated elements that are consistent for all RSS feeds and conform to the XML 1.0 specification. These elements need to stay consistent to allow for a standardized data format that RSS aggregators can then consume.

                An RSS feed always starts with an <rss> element, which contains an attribute called version, which specifies the version of the RSS feed.Today RSS version 2.0 is used world wide.

                <rss version=”2.0″></rss>

                <rss> element has a child called <channel> that is used  for  containing important data or content with in RSS feed .

                <rss version=”2.0″><channel></channel></rss>


                In order to describe an RSS feed there are some tags that can be added to the beginning of a feed.

                The required <channel> elements are <title>, <link>; and <description>. Optional channel elements are <language>, <copyright>, <managingEditor>, <webmaster>, <pubDate>, <lastBuildDate>, <category>, <generator>, <docs>, <cloud>, <ttl>, <image>, <rating>, <textInput>, <skipHours> and <skipDays>.


                • language – The language of the content in the channel.
                • copyright – The copyright notice for the content of the channel.
                • managingEditor – An e-mail address for the editorial content producer.
                • webMaster – An e-mail address for the webmaster.
                • pubDate – A date that represents the publication date for the content in the channel.
                • lastBuildDate – The last date and time that the content was changed.
                • category – Allows for the ability to add one or multiple categories that a channel belongs to.
                • generator – The program that created the channel.
                • docs – URL for the documentation for the format of the RSS feed.
                • cloud – Provides a process to register with a “cloud” that will be used to notify about updates.
                • ttl – Stands for time to live, which tells the length of time the channel can be cached.
                • image – Specifies an image file to be displayed in the channel.
                • rating – PICS rating for the channel.
                • textInput – A text input field that can be displayed with the channel.
                • skipHours – Tells aggregators to skip for specified hours.
                • skipDays – Tells aggregators to skip for specified days.

                RSS feeds are grouped into items, for example an item group could be considered news stories from a news Web site, blog posts from a weblog and so on. The following feed consists of an item from a weblog, which consists of a post. Typically an RSS feed for a weblog has multiple items that represent all of the posts to the blog. Following is an example of the RSS feed data that can be found in a blog.


                1 <rss version=“2.0”>
                2 <channel>
                3 <item>
                4 <guid isPermaLink=“false”>
                5 http://www.blogger.com/feeds/12931054/posts/115232323
                6 </guid>
                7 <pubDate>Fri, 01 mar 2010 21:08:00 +0000</pubDate>
                8 <title>Secure Ajax Requests</title>
                9 <description>
                10 <div xmlns=http://www.w3.org/1999/xhtml&#8221;>My latest article for InformIT, titled <href=http://www.informit.com&#8221;>How to Secure Ajax Requests</a> is on the homepage this week. This article focuses on ensuring that your database-enabled Ajax requests are secure and not leaving your database open for an attack. Enjoy…</div>
                11 </description>
                12 <link>
                13 http://www.annadshahil11.wordpresscom/blog/09/secure-ajax-requests.html
                14 </link>
                15 <author>anand sharma</author>
                16 </item>
                17 </channel>
                18 </rss>

                • guid – The guid is an element that contains a string that uniquely identifies the item.
                • pubDate – The pubDate is the date that the item was published.
                • title – The title is the title that is specified for the item; in this case it’s the title of the weblog post.
                • description – Contains the main data for the item, this element is used for the body of the weblog post in this case.
                • link – Contains a full URL to the individual page in which the specific item exists in detail.
                • author – Represents the author of the content that is presented within this item group.
                • category – Allows the item to be included into one ore more category.
                • comments – URL of page that contains comments related to the item.
                • enclosure – Can be used to describe a media object if one is attached to the item.
                • source – The RSS channel that the item came from.


                Reference :-

                http://www.webreference.com/authoring/languages/xml/rss/feeds/

                http://www.webreference.com/programming/javascript/rss_feeds_ajax/

                http://www.webreference.com/programming/javascript/rss_feeds_ajax/2.html

                http://www.developer.com/xml/article.php/3113931

                http://forums.digitalpoint.com/showthread.php?t=32265

                WEB 2.0

                WEB 2.0 :-

                It is a second generation of web developement and design that aims to facilitate communications , secure information sharing , interoperability (means ability of diverse systems and organisation to work together ) and collaboration on world wide web . Web 2.o concepts useerd in host services , applications such as social networking sites , blogs, video sharing sites , wikis .

                web 2.0 encourages interactivity and interconnectivity. Web 2.0 websites allow user to do more than just retreiving information . These sites provide controll to user so that they can own data and exercise controll over data.

                Web 2.0 is often feature a rich , user friendly based on AJAX, Open laszlo , Flex and other rich media.

                The Characteristic of web 2.0 are : rich user experience , user participation , dynamic content , metadata(Metadata (meta data, or sometimes metainformation) is “data about other data”, of any sort in any media. metadata would document data about data elements or attributes, (name, size, data type, etc) and data about records or data structures (length, fields, columns, etc) and data about data (where it is located, how it is associated, ownership, etc.)) , web standards and scalability(scalability is a desirable property of a system, a network, or a process, which indicates its ability to either handle growing amounts of work in a graceful manner, or to be readily enlarged).